

How Long To Sharpen A Dull Knife
How to Acuminate Knives With a Whetstone (for Beginners) 🔪
The single virtually of import tool in the kitchen is arguably a chef'due south pocketknife. Yet, it'due south often the most neglected instrument (along with the other knives in your pocketknife block). Why? Sharpening knives is intimidating. Or maybe you thought the honing steel would sharpen your knives. Nope, honing only straightens the edge of your knife.
A sharp knife needs less force to cut and is more predictable. You've probably had a scary moment where the knife slipped on whatever you were cutting and almost cut yourself. A dull knife is dangerous! A sharp knife simply works better — you'll cut through herbs instead of bruising them and y'all'll be able to prep ingredients faster.
A sharp knife won't give you the cutting skills of a master chef (that takes time and practice), but it will make your life a lot easier and make cooking more enjoyable.
Hither Is What You Need To Get Started:
-
A dull pocketknife
-
Double-sided whetstone (more than on that below)
-
Basin of water
-
Towel
Choosing Your Whetstone
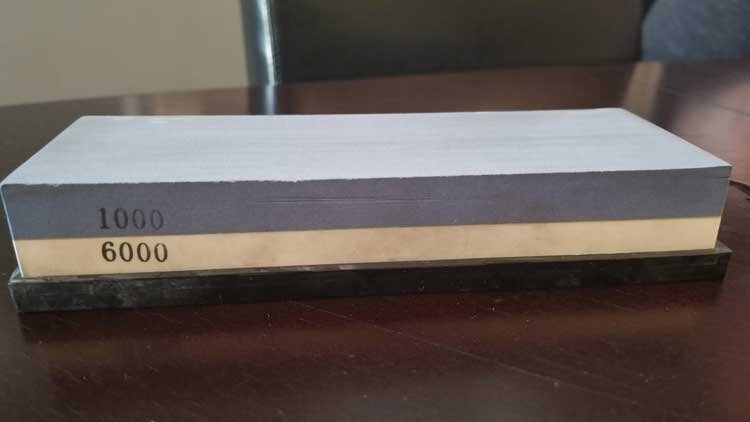
If y'all don't accept a whetstone just laying around for some reason, yous'll demand to buy one! Nosotros recommend buying a double-sided whetstone that's 6,000 grit on one side and 1,000 grit on the other. Without getting too technical, the smaller the number, the coarser the stone. Ideally y'all would have a diverseness of unlike stones with differing grit numbers to make your blade as sharp every bit possible. But if you're simply starting out, a two-sided whetstone volition become the task done.
Beneath are a few options!
-
Sharp Pebble Premium Whetstone 1000/6000
-
KING KW65 thou/6000 (with nagura stone)
-
DDF IohEF Sharpening Rock dust g/6000
Annotation: These are affiliate links that help us earn a small committee from your buy. Each purchase supports the blog so we can continue to make content! If y'all apply these links, we really capeesh it!
How to Sharpen a Wearisome Pocketknife at Home
One time you lot've gathered everything yous need, sit downwardly, plow on your favorite Spotify playlist, and get sharpening!
🔪 Step ane: Wetting the Stone
If yous have a whetstone that is required to be wet, first submerge the rock in water until no more air bubbling come out. The longer it takes to soak, the better off you lot'll be.
Make sure to periodically wet the stone during the sharpening process. Water + whetstone dust = slurry. Slurry is what is doing almost of the piece of work during sharpening. Don't completely soak the rock as that will wash the slurry away — add a few drops hither and in that location.
🔪 Footstep two: Finding the Angle
If you lot've ever done whatever research into blade sharpening you'll have probable heard most the angle of the edge. Essentially the angle will decide how "pointy" the edge is — the smaller the angle the more than pointy. Pointy edges are expert for cutting things, but they're non super durable. Conversely, less pointy edges aren't as bang-up for cutting things, but they are much more durable.
Nosotros could go on for a long time well-nigh the optimal angle that your pocketknife border should be at, just there is so much nuance and this is supposed to be a beginner's guide, and so we're going to focus less on the exact angle and more on staying consequent throughout the sharpening.
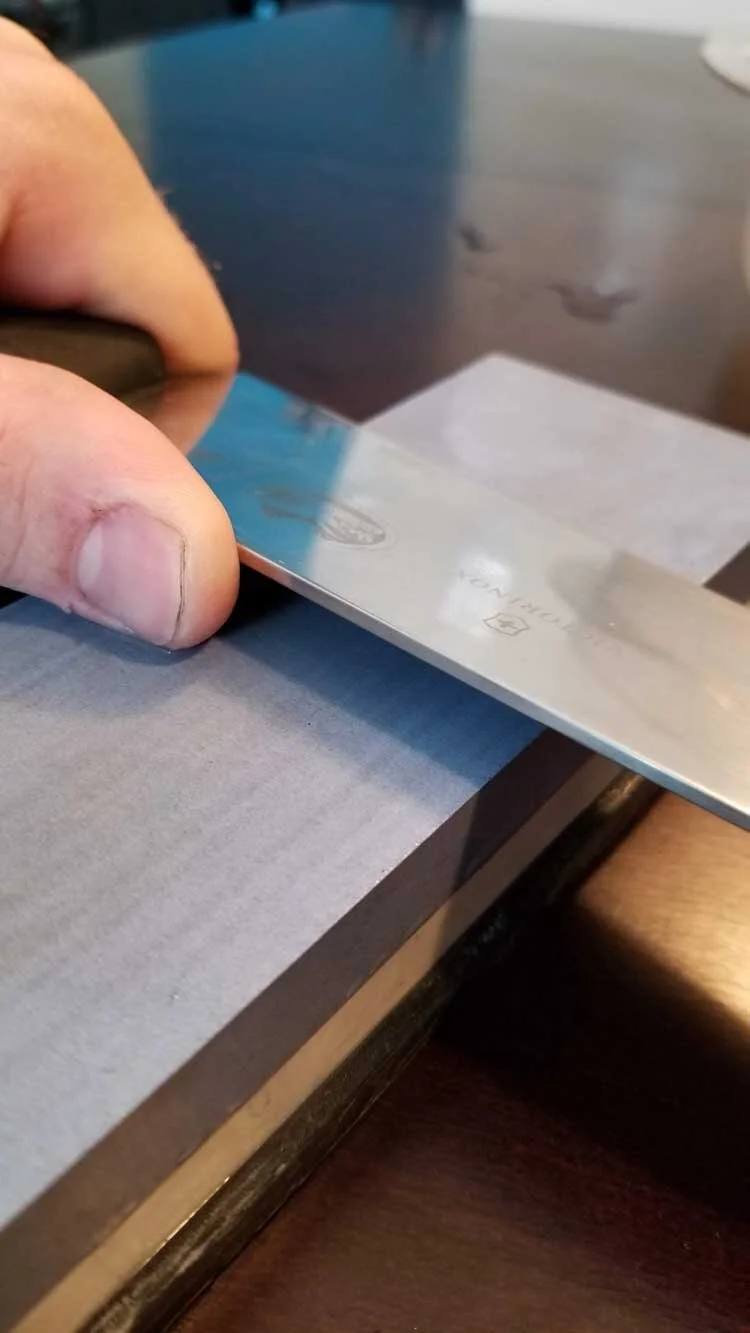
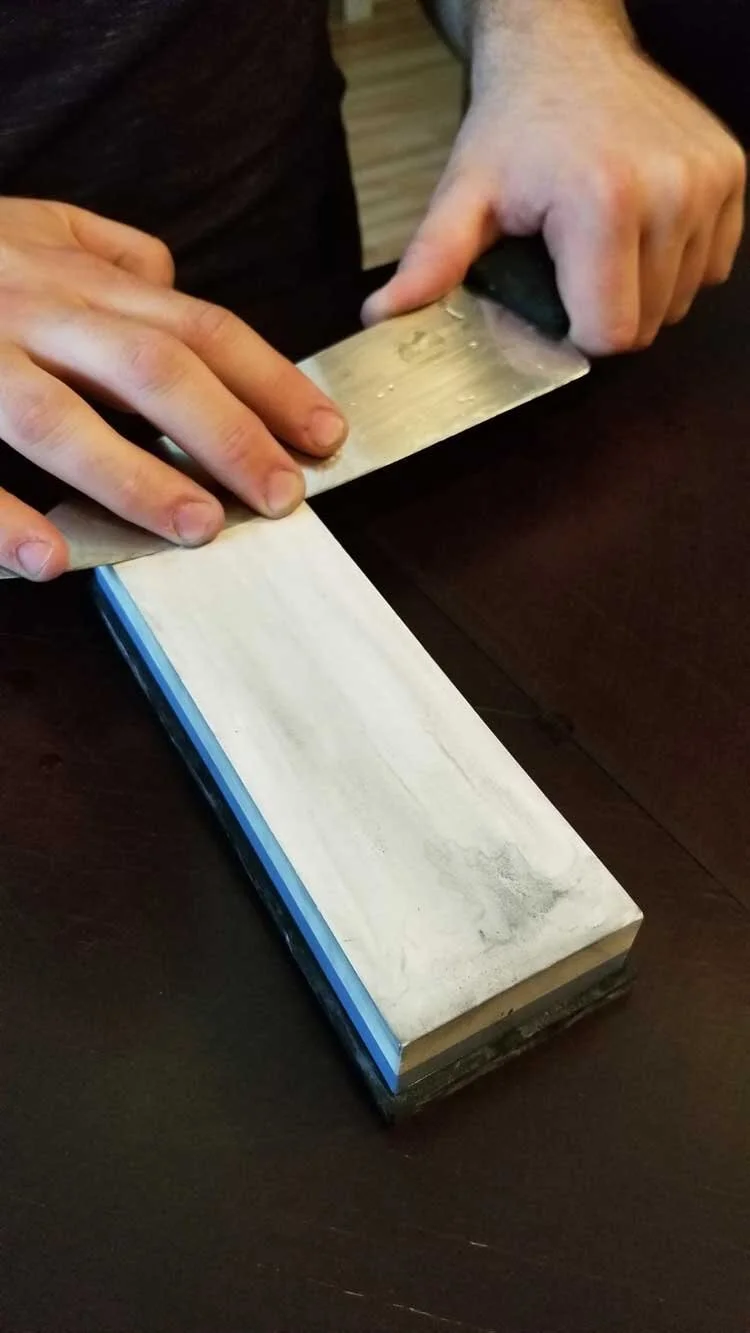
The easiest and simplest fashion to get a consequent bending is to put your blade so that it's perpendicular to the stone, and so rotate information technology so it is halfway between vertical and horizontal (this makes a 45 caste bending), then go halfway again — this creates an bending of 22.5 degrees. Try to recall how much infinite is between the back of the knife and the rock and keep that consistent throughout.
Mediocre Tip: We propose placing the edge of the knife on the stone and the spine (back) of the blade about halfway up your horizontal pollex. That should give you approximately the right angle!
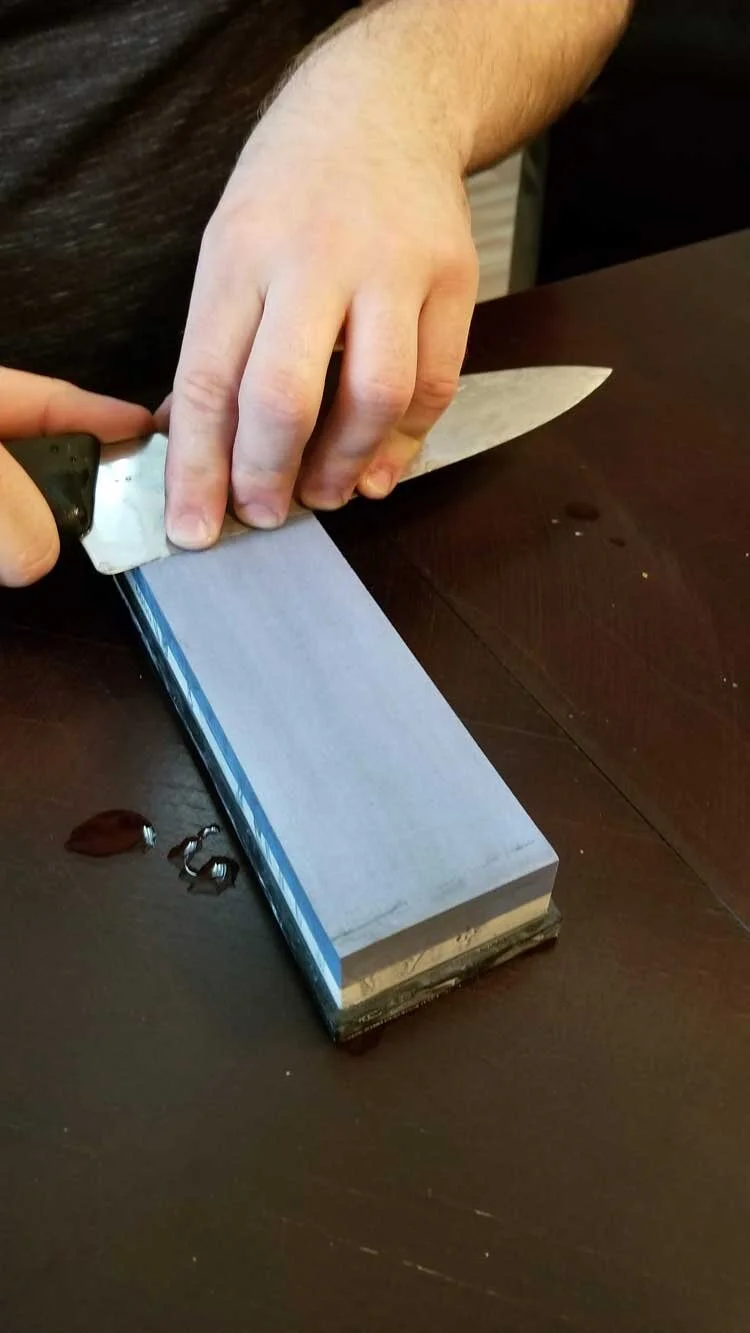
Another thing we'd like to touch on on is hand placement. We recommend starting with the handle in your dominant hand as this volition feel slightly more than natural. The manus that's holding the handle should take a firm grip and your other hand (the ane that will be applying pressure) should be placed and then that your fingers are on the blade near the border. Brand sure you have a firm grip at all time — losing control of the bract during sharpening is going to lead to you messing up the border, the whetstone, or your fingers. Become tiresome and stay in control.
🔪 Footstep 3: (Re-)Defining the Border
Aside from beingness dangerous, dull knives are also super annoying to apply. In one case yous've prepared the rock and found your angle, the next (and possibly nearly important) step in getting a razor sharp knife is to re-ascertain the border.
To do this you lot're going to desire to use the coarsest rock you take (use your 1,000 grit side). Find your angle and brainstorm the back and forth motility. You will only be applying pressure when you pull the pocketknife dorsum — applying pressure in the forward stroke can damage your stone and mess with the edge. Make certain to utilize a sizeable amount of pressure. Stand up up and put some weight into it if you need to.

Mediocre Tip: Don't worry too much about doing this rapidly. Instead focus on maintaining a constant pressure level and angle throughout the backwards and forwards motion. Piece of work advisedly, starting from the part of the blade closest to the handle and moving out towards the indicate.
You'll want to work in one inch sections for your first time — it's much easier to continue a consistent bending this way. Once you start getting towards the pointy end of the blade, the blade will probably begin to curve. How do you deal with this? Well, the simplest mode is to rotate the bract equally you lot pull back — do this slowly and you should exist able to friction match the curve of the bract while keeping a consistent angle.
How many times do you lot demand to go back and along? We recommend at to the lowest degree ten-15 times earlier moving on to the next section. This is of course going to depend on how boring the blade is and how much pressure you are applying, but 10-fifteen is a good approximate as you tin can't really over sharpen the blade.
Mediocre Tip: The all-time style to determine when information technology's fourth dimension to motility on to the adjacent department is feel it (carefully of course). Identify your thumb on the belly of your bract and move information technology to the cutting border. You lot should feel a slightly rough patch correct by the edge. This is chosen a burr and if you've created one, you lot can move on to the next section.
Once you've gone down the whole length of the blade, flip information technology over and repeat everything again. When y'all've done both sides, move on to the next stride.
🔪 Step four: Polishing the Edge
This step isn't actually polishing the blade, merely it'southward the best descriptor we could come up with. Again, ideally you would have a range of 4-6 different stones with varying grit that y'all would piece of work your manner up through. But for a beginner what you lot're going to do is flip your stone over to the effectively dust (the 6000 side), and echo the whole process over again: work down one side of the bract, flip the bract, work downwards the next side of the blade. When this is washed, move on to the final step.
🔪 Step 5: Honing the Border
Accept that lovely honing steel that came with your pocketknife block and that y'all thought was definitely a knife sharpener, and hone the bract. Maintaining the same angle equally in pace 2, advisedly pass both sides of the blade forth the honing steel ii-3 times. This will smooth out and align the blade a fleck. It should likewise remove some of the burr.
Congrats, you lot've sharpened your outset knife! Go out and do that love apple or paper cut.
Basic Knife Sharpening Tips
-
If this is your commencement time, piece of work S L O W 50 Y. Nosotros cannot stress this enough. Keeping the bending consistent is the most important factor in whether or not your knife will end up super sharp. Besides you are working with a knife afterward all, and a dull knife can nevertheless be dangerous.
-
If this is the get-go time you're sharpening a knife with a sharpening stone, practise on a pocketknife that you don't care so much most. You will probable scuff and marker information technology as y'all're trying to get the feeling of the motion, and so information technology'southward a practiced idea to practice the technique on a cheaper knife and non the $500 Damascus steel knife that you got as a present.
-
If using your pollex to gauge your angle, make sure your thumb isn't rubbing against the stone as yous go back and forth. Information technology won't hurt at kickoff, simply information technology will subsequently. Ouch!
Advanced Knife Sharpening Tips
-
Sharpening the knife wears down the rock and so you should rotate the stone often to ensure even wear.
-
If you have a stone that is particularly worn, you may take to resurface information technology with a leveling stone. These can get expensive, so beware!
-
Like nosotros said before, ideally you would accept a serial of stones of varying grit. Stones below chiliad dust are expert for repairing major damage to a blade (chips, pits, etc). Depending on how much y'all treat your knives, you may simply demand a quick sharpening with a 6000+ grit rock or you may have to showtime all over one thousand grit again.
-
If you are going to invest some coin into a good stone ready, you may also want to invest in a leather strop. A leather strop would be used in place of a honing steel to align, shine, and polish the knife. This is how yous're going to get a super shiny and razor precipitous edge.
Taking Care of Your Kitchen Knives
So you lot've sharpened your knives. Great, let's go along 'em sharp. Here'south how:
-
Hand-wash and dry them later on using. However tempted you are to put your knives in the dishwasher, don't. Just don't.
-
Don't leave your dirty knives sitting in the sink. Don't procrastinate and hope to hand-launder them later. They can get scratched/dented past whatever other dishes you throw in the sink! Plus, they'll clean more easily if you wash them correct away.
-
Store your knives properly! Don't go along your knives stored loose in the utensil drawer, for the aforementioned reason you shouldn't allow them sit in the sink. If you do, at least take a plastic knife guard for your knife. Ideally, store your knives in a pocketknife block. Or if yous have the wall space, you tin can exist fancy and braze your knives to a magnetic strip!
-
Always cutting on a cut board. Surfaces like your granite or marble kitchen counter-top are too hard for your blade. To keep your knives sharp, use a wood cutting board! Plastic is fine, also.
-
Hone your knife. Straightening the edge of your knife volition assistance information technology cut better. If yous have a pocketknife cake, it probably came with a honing steel!
Pocketknife Sharpening Videos
If you're more of a visual learner and our text + images aren't adept plenty, here are some videos we recommend checking out from our favourite YouTubers.
Are you ready to try sharpening your kitchen knives? Choose your least favorite knife commencement, and get practicing!
What'due south your favourite kitchen knife? Permit united states of america know in the comments below!


Source: https://www.mediocrechef.com/blog/how-to-sharpen-kitchen-knives
Posted by: tuckerimpres.blogspot.com
0 Response to "How Long To Sharpen A Dull Knife"
Post a Comment